Showing posts with label Cooking. Show all posts

Monday, July 25, 2011

Ore-Ida Sweet Potato Fries with Maple-Cinnamon Dipping Sauce #OreIdaFries

 
This weekend, we headed to Sam's Club to stock up on some things we needed, as well as some items for our big California trip coming up! Like always, we found some interesting things we wanted to try, like these Lemondrop Melons! Have you ever heard of them before? Tried them?
We were so intrigued that we had to get one! And, we also decided that we had to try Ore-Ida Sweet Potato Fries by Heinz! They sounded good and I thought they would be something a little different that the boys would like. I often used sweet potatoes for homemade baby food for both the boys, but have rarely served them lately. So, I thought it would be something fun to get! You can check out my Intersect story for our whole Sam's shopping experience with more fun things we found! 
Since we were trying new things, I came up with a different type of dipping sauce to go with the sweet potato fries. And, since the kiddos love the marshmallow/maple syrup/cinnamon type seasoning on them at the holidays, I thought we'd go with a sort of sweet dip!


Maple-Cinnamon Dipping Sauce:
Ingredients:


- approx 1 C plain greek yogurt
- 1/4 C maple syrup (real maple syrup would have been better)
- 1 t cinnamon
Directions:  Mix yogurt and maple syrup. Add 1 tsp. cinnamon. Stir together until well-combined. Eat with your sweet potato fries! 
Super tasty! The kids LOVED it!

Do YOU like sweet potato fries? What's your favorite sauce?

Feel free to share in the comments or on the Heinz Ore-Ida Facebook page!
Disclosure: This project has been compensated as part of a  #OreIdaFries shopping mission for Heinz with #collectivebias. As always, all opinions and experiences are my own.

Thursday, June 23, 2011

Easy Homemade Sangria

If you like sangria, this is SUPER easy and SO good! All you need is a cheap red wine, lemonade (we usually use Simply Lemonade, but this was on-sale and really inexpensive), and some sliced citrus!
You can use whatever percentage of each that you like. I usually end up with a 60-70% lemonade/30-40% wine mix. 
Simply pour the wine and lemonade into a pitcher, then add a good amount of sliced citrus (that pitcher had between 15 and 20 slices). This batch only had orange and lemon, but I've also added lime before. Really, you can add whatever fruit you like, but with the lemonade, the citrus tastes perfect!
That's it! Quick, easy, inexpensive, and a little dangerous as it's rather refreshing and many find that they can drink quite a bit of it, so drink responsibly! :)
 
*If you noticed in the picture, the citrus slices are in freezer bags. This winter, we had an abundance of citrus. So, with some of the fruit, I washed it, cut into slices, placed on cookie sheets and froze. Once frozen you can put a bunch of slices into baggies-- then, take them out for garnishes or to flavor water, tea, or sangria! 
 
What fruit do you like in your sangria?


Homemade Salsa

My mom has been making homemade salsa for as long as I can remember. It's SO good--just as good (or better) than many restaurants' fresh salsa! Yes, I know I'm biased, but seriously it gets rave reviews just about anytime it's made! Making it so inexpensive, easy, fresh and SUPER delicious!! And, the beauty is the recipe can be tweaked just about any way you like!  

Ingredients:
 
 - 1 large can (28oz) whole peeled tomatoes 
 - 3 15 oz cans diced tomatoes (I often like to use some with "flavors" like fire roasted, garlic, or mild green chilies added)
 - 1 small (8oz) can tomato sauce
 - 3 small cans diced green chilies (mild)
 - 1 bunch green onions (I know the pictures shows 2, I only ended up using one)
 - 1/2 bunch cilantro (more or less to taste)
 - fresh lime juice (to taste)
 - garlic (minced and/or garlic powder to taste)
 - La Victoria Salsa Brava Hot Sauce to taste
 - dash of red wine vinegar and olive oil


Directions:
 - start by dumping the can of whole peeled tomatoes into a large mixing bowl (don't drain anything!). Break the tomatoes by hand or cut. Continue with all canned ingredients.
- wash and chop entire batch of green onions. Add to bowl.
 
- wash and remove leaves from cilantro (no stems). Chop cilantro leaves and add to bowl.
- add juice from half a lime, garlic to taste, and hot sauce to taste. I recommend starting with a small amount of hot sauce, mixing well, and tasting. A little hot sauce can go a long way! Add a dash of vinegar and oil. Stir. And, voila, homemade salsa! *Important note: this salsa must be refrigerated and usually keeps for about 2 weeks.
   
Serve up with some chips and enjoy! :) It's PERFECT for parties!!
 
What's YOUR favorite salsa?

Wednesday, June 15, 2011

Grill Up Your Summer with Tropical Teriyaki Kabobs!!

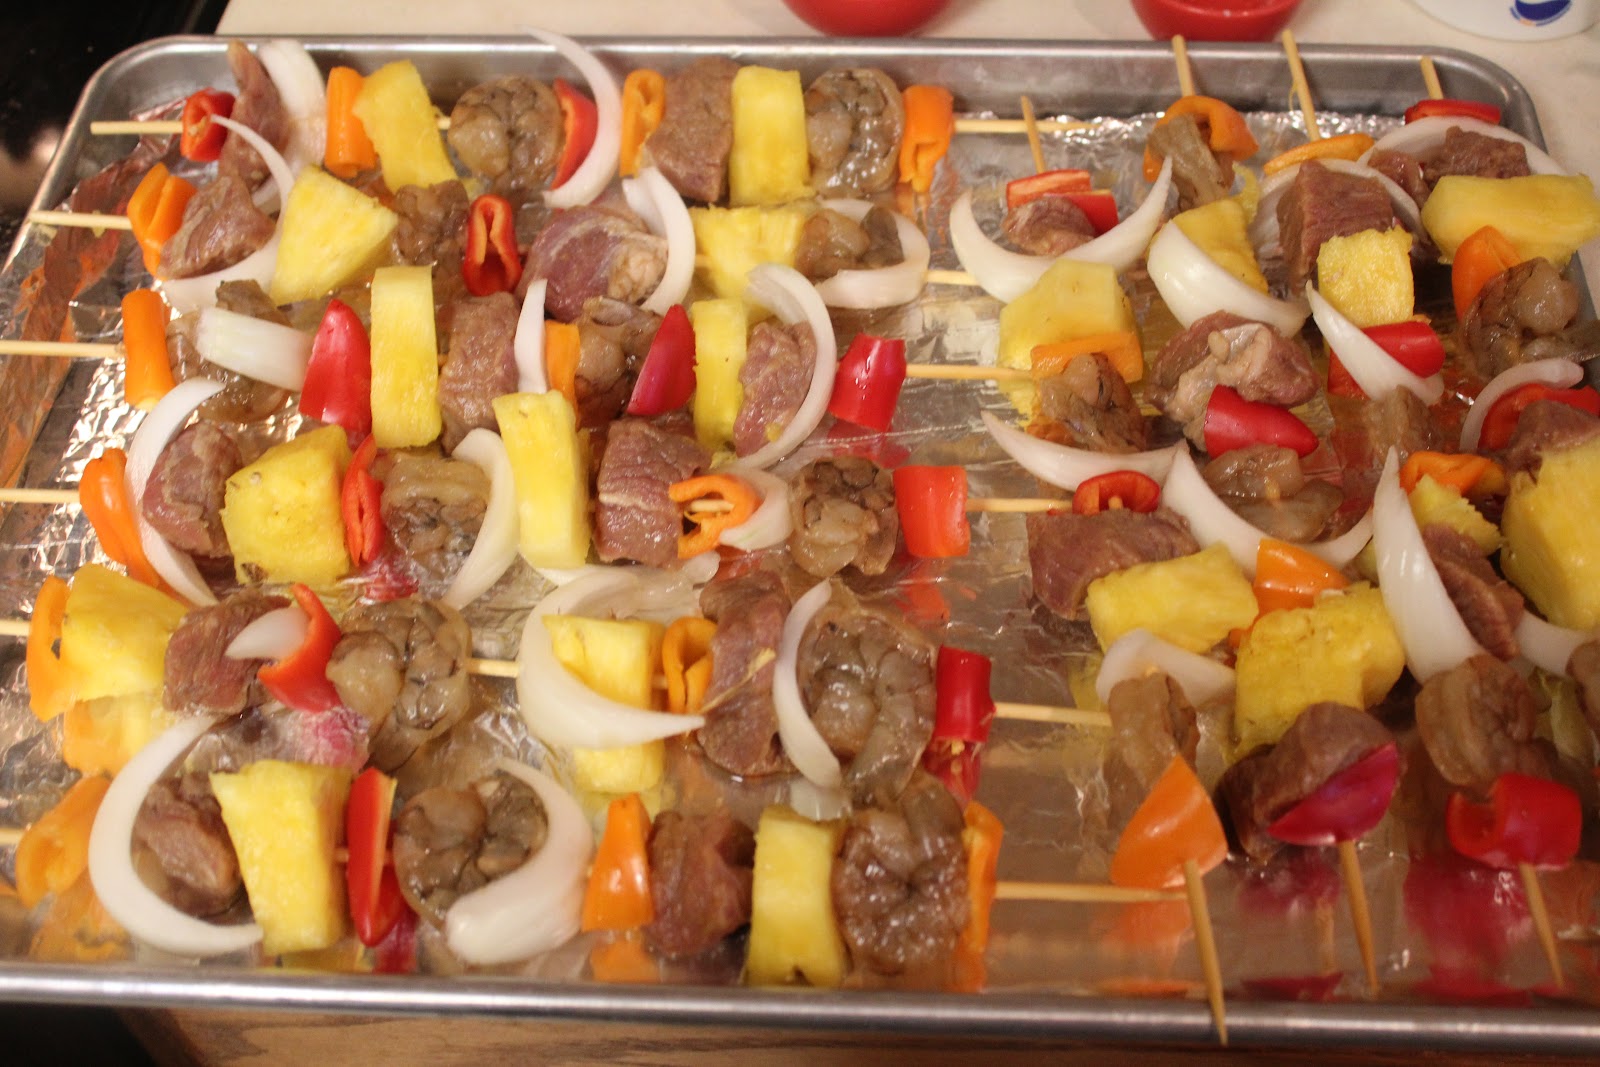
These tropical teriyaki kabobs made for the best dinner we've had in a LONG time! We've been getting more adventurous with our grilling lately (did you see the grilled desert we made?!)! So, when I heard that Smart & Final and Cattleman's Finest were putting on a summer grilling contest, I knew I wanted to participate! You can visit GrillUpYourSummer.com to get details on the contest, vote for THIS your favorite recipe, and have a chance to win some great prizes! 

Now, on to the recipe details...
Ingredients:
- beef (we used a 2lb. Cattleman's Finest tri-tip oven roast that worked great!!)
- large raw shrimp 
- fresh pineapple 
- orange & red bell peppers (that minisweet package from Smart & Final was perfect!)
- sweet onion
- skewers

Directions:
1. Cut the meat into cubes (try to keep the sizes as even as possible and not too large--I aimed for about 1 square inch cubes. Also, trim off any additional fat.)
2. Clean the shrimp (peel off the shell & tails and rinse)
3. Marinate the meat in a teriyaki sauce (use any teriyaki-style marinade you like. I chose to use a homemade tropical teriyaki sauce that was DELICIOUS! If you choose to make it, I recommend doing that first, before prepping any of the meat. That way, the flavors have a chance to blend well. For marinating, I just placed the beef & shrimp in a large sealable baggie with about 1.5C of the homemade teriyaki marinade. Allow at least one hour for the meat to marinate, ideally, flipping the baggie over about half-way through.)
4. Cut the pineapple and veggies (just like with the meat, try to keep the sizes as similar as possible.)
5. Assemble the kabobs (put the meat, fruit, & veggies on to the skewers in any order you like! I aimed to have at least two of each item per kabob! *IMPORTANT: If using bamboo skewers, you MUST soak them in water before assembly. I recommend soaking for at least 30 minutes to one hour--easy to do while the meat is marinating).
6. Grill 'em up! (grill over medium heat for about 8 minutes per side. To avoid too much burning, we turned them every 3-4 minutes, and rotated placements on the grill as needed)
Baste with unused marinade. We used a thickened version of the homemade tropical teriyaki sauce.
Don't they look SO good?!
7. Serve, eat and enjoy! (we plated ours on top of some steamed brown rice. Delish!)
And, in keeping with our tropical theme, we served up some ambrosia "salad" for dessert! 
If those tropical kabobs sound good to you, please head on over to GrillUpYourSummer.com and vote now! We could both win a sweet grill & a $50 gift card!! :) 


How do YOU like to grill up your summer?
Disclosure: This project has been compensated as part of a social shopper insights study for #collectivebias #GrillUpYourSummer. All opinions and experiences are my own.

Monday, June 13, 2011

Ambrosia Recipe

For as long as I can remember, my family would often have "ambrosia" as a desserty-side dish at various holidays and family get-togethers! Over the years, I've come to realize that there are actually TONS of different recipes for "ambrosia" salad, all with varying ingredients. Our version of "Ambrosia" might even be known to some as "Mandarin Orange Salad". But, no matter what you call it, it's quick, easy, tasty, and perfect for summer!
And, in our house, THIS is the one and only, "Ambrosia" (which is almost always at least doubled!!):

Ingredients:
  - 2 (8oz) cans mandarin oranges (drained)
  - 1 (20oz) can pineapple tidbits (drained)
  - 2 cups mini marshmallows
  - 1 cup shredded coconut
  - 1/2 pint sour cream

Directions: 
Mix all ingredients in a large bowl. For best flavor, refrigerate overnight. That's it! Easy-peasy! 

Have YOU had ambrosia? What's your recipe like?

Thursday, June 9, 2011

Homemade Teriyaki Sauce

I made homemade teriyaki sauce for the first time yesterday and it was DELICIOUS! We put it on a super yummy grilled dish that I'll be sharing with you soon! It was not only easy to make, but I love that there is less salt & preservatives than in the bottled variety. We were going for a tropical taste, so here's our recipe:

Tropical Teriyaki Sauce
- 1/2C soy sauce
- 1/2C orange juice
- 1C pineapple juice
- 1/2C red wine vinegar 
- 1/2t ground ginger
- 1t garlic powder
- 1T honey
- 1T brown sugar

For marinating meat, you can use it just like that. In fact, I used about half for that purpose. Then, if you'd like some thicker for basting while on the grill, dipping sauce, chicken wing sauce, etc. you'll need to add a little cornstarch. 
Here's what I did (to incorporate with 1/2 of that amount of liquid above)...
(in a separate small bowl) dissolve 1T corn starch into about 2T of water. Once fully dissolved, add to the teriyaki sauce. 
Normally, you should heat this up in a small pan, stirring constantly until thick. However, I did it in the microwave and it came out fine. I heated it on high in about 1 minute increments, stirred, and then continued heating. After about 3 minutes, the sauce was perfectly thickened for basting on the grill! 
If that sounds yummy, stay tuned as I'll be sharing in the next week what we put this tropical teriyaki on! 

What homemade sauces/dressings/marinades do YOU like to make?

Monday, June 6, 2011

Fruity Morning Muffins

These muffins are so yummy and the perfect way to use up fruit that may be getting too ripe & need to be eaten! My mom and I adjusted a recipe she had found (no idea where it came from) based on the fruit and ingredients we had. Here's what we came up with:

Fruity Morning Muffins
(made 2 dozen muffins + small bread loaf)
3 C flour
¼ - ½ tsp cinnamon
1 tsp baking soda
2 tsp salt
¼ tsp nutmeg
4 eggs
3 mashed ripe bananas
¼ C canola oil
¼ C yogurt (we used flavored vanilla & strawberry-banana)
½ C sugar
½ C agave nectar
1 ½ C chopped strawberries & cherry mixture
1 ¼ pint blueberries
2 lemons zested
(optional: 1-2 C walnuts or pecans)

Directions:
preheat to 350; in smaller bowl, mix flour, cinnamon, soda, nutmeg, and salt; in larger bowl whisk together mashed banana, eggs, oil, sugar, agave nectar, strawberry mixture & lemon zest. Mix dry ingredients INTO wet ingredients until combined. Do not overmix. Fold in blueberries (& nuts if including). Scoop into muffin tins/bread pans. Bake approx 30 minutes.

There are so many different things you could do with this recipe--the possibilities are endless...maybe a pineapple, mango, banana, and coconut muffin...or all berries...hmmm...I may also experiment with making them even more healthy by using all agave nectar or honey instead of white sugar, all yogurt or applesauce instead of the oil, or whole-wheat flour. In any case, this is one recipe that will be getting made again!
YUM!

What are YOUR favorite muffins?

Thursday, June 2, 2011

Grilled Poundcake with Fresh Berries

At our backyard party last weekend, everyone was SO intrigued by our featured dessert: grilled poundcake with fresh berries! The idea came from Party Bluprints' "Fired-Up" plan
We'd never done anything too exotic with grilling before, mostly just standard meats--hamburgers, hotdogs, chicken, steak, etc. So, as soon as I saw this, I was super interested and wanted to give it a try. We simplified the Party Bluprints' recipe just a bit and it's seriously so easy! All you need is poundcake, berries of your choice (we did blackberries & strawberries), and vanilla ice cream. 
Before the party, I diced up some strawberries and cut the black berries in half into a large bowl (& added just a small spoonful of sugar over all the berries). When it was time for dessert, we sliced the poundcake nice and thick--didn't want it crumbling on the grill. After about a minute or so on the grill, the smell was incredible--like roasting marshmallows! 
 
Seriously so good! We left them on for about 2-3 minutes per side. In one of the hot spots though, they did burn, so be careful of that!! Basically, you just want to leave it on long enough that it gets warm and the grill marks show up!
Immediately after grilling,we topped with vanilla ice cream and the fresh berries!
Everyone seemed to really enjoy it and we highly recommend it!! The perfect summer grilling party dessert!! Thanks to the ladies at Party Bluprints for such a great idea!!

Have YOU done any grilled desserts? Would love to hear your ideas & recipes!

Thursday, May 5, 2011

Chicken Bulk Cooking with First Street Products + a Smart & Final FREE Groceries Contest!

It should come as no surprise that I love a good deal and sometimes that means buying in bulk. I really like doing this with meat when the price is right and then doing some quick batch "cooking", like this ground beef session. Often times, I find really good deals for this at Smart and Final!
Recently, I found a good deal on their First Street Chicken (which I can often get for $.99 or less per pound).
  
I started with one package of chicken breasts and one of leg quarters--all in all, just over 10 pounds of meat for less than $10! Sweet!  
Here's what I did:
- Baked the chicken (put it into two pans with just a little sprinkle of olive oil and Italian seasonings on the chicken) 
- After letting that cool for just a few minutes, I transferred all the chicken into one pan and got out a large pot. I dumped all the drippings from the now chicken-less pan into the pot. And, one piece at a time, started picking the chicken off the bone in the empty pan. All the skin and bones (and whatever bits of meat won't come off), got thrown into the pot.
- After all the chicken was picked, I put just enough water in the pot to cover the chicken. I added a little bit of chopped onion, some garlic, and some frozen celery tops (I save them when cutting up celery to use for soups & broths like this). This simmered for about 30 minutes.
 
- While that simmered, I made some easy chicken enchiladas. This brings me to more First Street products I love--all the containers! There are SO many to choose from! I like having some extra aluminum containers on hand for some extra freezer meals or when taking meals to others' houses/giving as gifts. So, the chicken enchiladas were put into a pan.
- When all was said and done, we had a pan of enchiladas, 4 containers of broth, 2 freezer bags of shredded chicken, and a BBQ chicken for dinner that night! Pretty sweet! 
And, there are some pretty sweet things going on for you! If you live near a Smart and Final, you can head in this week (May 4th-10th) and snag $5 off when you buy 10 participating First Street products (and there are A LOT of options!)
Even better, how do FREE groceries sound?!  

 Each week this month, 5 winners will be chosen to receive a free bag of groceries and a gift card! Head on over to the Smart & Final Facebook page to enter!

Disclosure: This project has been compensated as part of a social shopper insights study for Collective Bias, but all opinions are my ownFor more information, read my disclosure policy.

Wednesday, May 4, 2011

Celebrate Cinco de Mayo with Ortega Whole Grain Products

Tomorrow is Cinco de Mayo--the perfect time to cook up a Mexican food dish for dinner! Last year, we had a yummy Mexican Lasagna and this year, will be doing some Taco Casserole from Ortega
Doesn't that look yummy?
I think so--and even better, Ortega has some healthier versions of commonly purchased products! Whole grain taco shells, whole wheat tortillas, and 40% less sodium taco seasoning!
 
We were recently sent these products to try and are really happy with them! I love having low(er) sodium options available! Plus, I really like seeing whole wheat/whole grain products too!
Just the other night, we had some super easy chicken "enchiladas" made with the whole wheat tortillas and taco sauce. 
I mixed up about 3 cups of shredded chicken (from a bulk chicken cooking/processing session) with 1 8oz "brick" of cream cheese (I use 1/3 reduced fat) and about a 1/2C of taco sauce (I didn't want them to be too spicy so the kids would eat them).
 
Then, I spread some of the mixture with some cheese (in this case, I had some shredded "Mexican" blend) on the tortilla & rolled it up. After the pan was full, I sprinkled everything with shredded cheese and baked that way. I did not cover the whole pan in enchilada sauce/salsa because the kids wouldn't eat it that way. So, I just added that after it was baked (and had taken out a couple for the boys). 
  
Easy & yummy, plus healthier than normal with Ortega's whole grain tortillas! So, if you're into a bit "healthier" versions of your favorite Mexican dish, look for these Ortega products at your next store trip.


What's YOUR favorite Mexican food?

Disclosure: This post was written for Family Review Network and Ortega who provided the complimentary product in exchange for my honest review. For more information, read my disclosure policy.

Tuesday, May 3, 2011

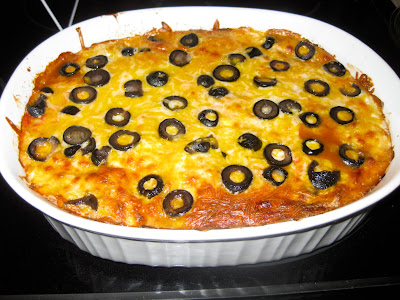
Mexican Lasagna

Living in the southwest, we're reminded almost everywhere that it's Cinco de Mayo this week. And, that means it's a good excuse for some Mexican food! Although, let's face it, I don't really need an excuse for that! :)
At this time last year, I had a one month old and this was the first "real" meal I had made in quite sometime. I wanted to try something new that would be fairly easy, so I looked up some different casserole-type ideas and found numerous recipes for Mexican lasagna. None of them fit exactly with the ingredients I had, so I concocted my own.


Ingredients:
- 1.5 lbs ground beef
- 1 clove garlic
- 1 can black beans
- 1 can green chilies
- 1C salsa
- 3 medium whole wheat tortillas
- 3/4 C cottage cheese
- 3/4 C sour cream 
- 1 C shredded cheese 
- 1 small can black olives


Directions:
- Brown ground beef with garlic (would have also browned it with onion, but we didn't have one at the time). When close to done, add a can of green chiles, a can of black beans, and about a cup of salsa.
- Cut up tortillas into strips (to resemble lasagna noodles) and mixed up cheese mixture (combine cottage cheese, sour cream, and a bit of the shredded cheese. You could use a little more than my amounts listed above. I just was trying to use up what I had left).
- Once the meat is done, spread about 1/3 of the meat mixture and put that on the bottom of my casserole dish, layer with tortilla strips on top, and spread about 1/2 the cheese mixture on top of the tortillas.
 - Repeat that again, ending with the final 1/3 of the meat mixture. Then, on the very top add some more shredded cheese & sliced olives. Bake on 350 until everything is golden & bubbly.
Serve it up with some homemade guacamole and chips. Mmm...
It was quite yummy! The only problem was that Big Brother found it to be too spicy. So, in our house, it's not really a kid-approved dish! But, the adults loved it!

Do YOU make anything special for "Cinco de Mayo"?

Wednesday, April 27, 2011

Spring Fruit Tart with Baked by Joanna

Hi everyone! My name is Joanna and I have the pleasure of writing to you all today on Mom Endeavors thanks to Sara. I have a blog called Baked by Joanna that features recipes, party ideas, my baking and more...I like to think of it as my life journal.
Joanna at the dog park
So who am I? I am a home baker that has a passion for food and entertaining. From weddings to fun treat bags, I like to do it all. Most of my party planning comes handy when I entertain at home.
Photobucket
I have a husband and two pups you see, so how can I not be overly enthusiastic when my hubby and I have guests over for a sports party or when we wish our pups another happiest of birthdays? And now, with all my friends having tiny tots of their own, I am secretly planning parties in my head that I want to bring to life. Exciting!
White Chocolate Strawberry Cake
Anyways, my dream of owning a bakery has developed into a dream of creating an event planning company that has a strong emphasis in food. My love for food collides with the world of parties and I would not be complete if I didn't have both. Perhaps one day it will happen. *positive thinking*

Well, enough about me. What do I have for you? A few party tips and a recipe to keep you busy this spring, of course!

Spring is about reviving your activities from indoor to outdoor and enjoying the company of friends and family. So here are a few tips and ideas to get your Spring activities going again:

-Dust off that patio set and add some fresh flowers, light snacks and lemonade and enjoy the afternoon with friends while catching up on all of life's happenings.
-BBQ - nothing says yummy and brings good company together like grilling out.
-Plan outdoor activities with your children to get them away from those pesky electronics. Try a picnic in the park, the local botanical garden or a bike ride to an art walk.
-Don't forget your pups! This is the best time of year to visit dog parks and mingle with all the other fluffy characters.
-Lastly, stop and smell the roses. Too often we let "busy" take over our lives and it's just as important to make time for yourself as it is to make that deadline. Dare I say, it is actually more important. Enjoy life and yourself.

Now, to give you that entertaining edge, here is a delish recipe that I created just for you. The best part is that you can change the fruits you use to match different seasons. :)
Photobucket

Spring Fruit Tart

Serves 6

Ingredients
1 cup all-purpose flour, plus extra for dusting
1/4 tsp salt
1/4 cup shortening
1/3 cup ice cold water
1 large banana, sliced 1/4" thick
1 cup strawberries, thinly sliced
1 pinch ground nutmeg
1/2 tsp ground cinnamon
1/3 cup blueberries, fresh or frozen
zest of 1 lemon
1 tbsp unsalted butter, melted
2 tsp sugar

Directions
Preheat the oven to 425 degrees F.

In a bowl, using your hands, mix the flour, salt, shortening and water together until a ball of dough is formed. Be careful to not overwork the dough, and add additional flour or water as needed. Place the dough on a floured piece of parchment paper. Roll the dough on the paper to approximately a 12-inch round.

In the center of the dough, layer the bananas making sure to leave 1 1/2 inches of the dough uncovered from the edges. Now layer the strawberries over the bananas and dust with the nutmeg and cinnamon. Scatter the blueberries and lemon zest over the strawberries.

Begin folding the edges of the dough in to form a crust. Brush the crust with the butter and sprinkle sugar over the entirety of the tart.

Place the tart and parchment paper on a cookie sheet and bake in the oven for 35 minutes or until the tart's crust is golden brown. When baking is done, cool the tart on a rack before slicing.
Photobucket
Now serve and be the talk of all your friends. :)

I hope you get to enjoy this recipe, and don't forget to stop by Baked by Joanna for more recipes and entertaining tips. Thanks for having me on Mom Endeavors!

Tuesday, March 29, 2011

Buffalo Chicken Dip

Without a doubt, the favorite thing at our March Madness Party was the buffalo chicken dip! It was the only thing that was all gone at the end of the night! I got the idea from the March Madness Party Bluprint, but tweaked the recipe a little (reduced the hot sauce content & added some ranch). Such delicious party dip!!

Here's what you'll need:
- 1 8 oz. package cream cheese (I used fat free & it still tasted great)
- 1/4 C sour cream (I used light)
- 1/4 C ranch
- 1/3 C hot sauce
- 2 C chopped chicken
- 1/2 -3/4 C shredded cheese


Directions:
- Preheat oven to 350. In small bowl, mix chicken, sour cream, ranch, & hot sauce
- Spread cream cheese on the bottom of a baking dish
-Spread chicken mixture over cream cheese and top with cheese. Bake for 20-25 until cheese is "melty". 
  - Serve with crackers, tortilla chips, or celery (my personal favorite was the celery).
 
- Watch it disappear! :) 
Related Posts with Thumbnails